Rainbow Mini Cheesecakes? Yes, please! 🌈
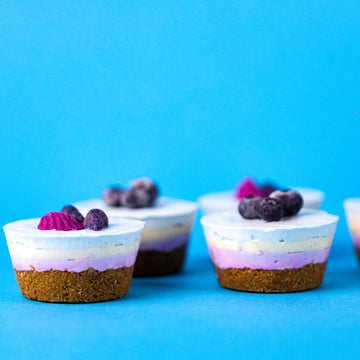
Get ready to wow your taste buds and impress your friends with a dessert that’s as fun to make as it is to eat! These adorable mini cheesecakes are not only absolutely delicious, but they’re also bursting with vibrant colors that’ll make your Instagram followers hit that like button in a heartbeat.
The magic lies in Yes Superfood powders—bringing natural, bold hues with a sprinkle of creativity. The best part? These mini treats are so simple to make that even newbie bakers can whip them up like pros.
Layer your favorite colors, top them with some fresh berries and edible seashell decorations, and voilà—a dessert masterpiece! Cool, creamy, and delightfully crisp, each bite is a slice of heaven. Ready to dazzle everyone with this rainbow magic? Let’s get baking and make them today! 🧁✨
Ingredients for 6 Cheesecakes:
- 170 g shortbread cookies (about 12 round cookies)
- 15 g unsalted butter, melted
- 1 packet (7 g) unflavored powdered gelatin
- 2 tbsp cold water
- 450 g full-fat cream cheese, at room temperature
- 100 g granulated sugar
- 1 tsp lemon juice
- 1 tsp vanilla bean paste or vanilla extract
- Pinch of salt
- 120 g heavy cream, at room temperature
- Yes Superfood powders for coloring
- Edible seashell decorations made with Mermaid and Seashell Silicone Molds and fresh blueberries
Method:
-
Prepare the Crust:
Blitz the shortbread cookies into fine crumbs using a food processor, or crush them in a bag with a rolling pin. In a bowl, combine the crumbs with the melted butter. Divide the mixture evenly between the cavities of a silicone muffin pan and press it firmly into the bottom to form the crust. -
Prepare the Gelatin:
Sprinkle the gelatin over the cold water in a small bowl and whisk to combine. Let it sit for 5 minutes to hydrate. Microwave the mixture for 10-15 seconds until fully liquid. -
Make the Cheesecake Mixture:
Place the cream cheese in a large mixing bowl and beat with a stand or hand mixer until smooth and creamy. Add the sugar, lemon juice, vanilla, and salt, and mix well. Gradually mix in the heavy cream while running the mixer on low speed until the mixture is smooth and fully combined. Add the liquid gelatin and mix until incorporated. Scrape down the sides of the bowl to ensure everything is evenly mixed. -
Color and Layer:
Divide the cheesecake mixture into three portions. Add ½-1 tsp of Yes Superfood powder to each portion and stir until the colors are smooth and uniform. Layer each color into the muffin pan cavities, starting with the first color. Smooth each layer with the back of a spoon before adding the next. Work quickly to prevent the mixture from setting before all the layers are added. -
Freeze:
Place the pan in the freezer for at least 2 hours, or until the cheesecakes feel very firm to the touch. -
Unmold and Decorate:
Press gently from the bottom of each cavity to unmold the cheesecakes. Allow them to sit at room temperature for 30 minutes to thaw before serving. Top with edible seashell decorations and fresh blueberries for a finishing touch.
Storage:
Store the cheesecakes in the refrigerator, well-wrapped, for up to 4-5 days. Serve chilled but not frozen.


